
The Properties editor is the tall, tabbed panel positioned by default at the bottom right of the Blender window, below the Outliner. It is used to inspect and change almost every setting in a scene, from the render engine and world background down to the transform and material of a single object. The aim of this topic is to read its tabs correctly and edit its fields accurately, a practical skill that recurs in every subsequent class. Concretely, you should be able to locate the Properties editor and its vertical tab column, name what each context tab controls, explain why the tabs change with the active object, and read and edit any property field while relating it to the Sidebar.
Where it lives
The Properties editor is a full editor, not a floating window. Its default position is the bottom right, directly below the Outliner. Because it is a standard editor, its type can be changed from the editor type dropdown in its header, exactly as with any other editor. Along its left edge runs a vertical column of icons. Each icon is a tab representing one category of settings, and clicking a tab swaps the whole panel below it. The tab column itself is specific to this editor type. Hovering over any icon displays its tooltip name.
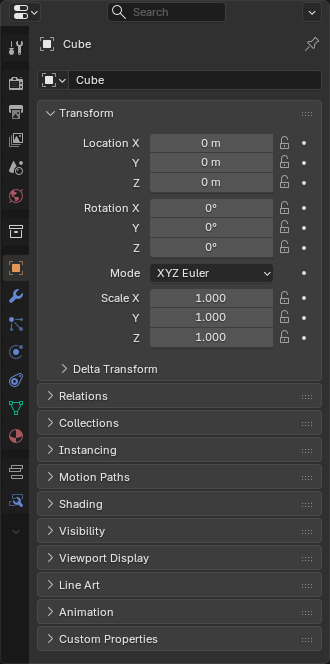 Image: Blender Manual (CC BY-SA 4.0)
The tab column: top group
The tabs divide into two conceptual groups. The upper group concerns the active tool and then the whole scene and render, not any single object. From top to bottom these are:
- Tool: the active tool and workspace settings (full name Active Tool and Workspace Settings). It mirrors the tool chosen in the 3D Viewport Toolbar, so it changes as different tools are selected, and it also holds workspace settings.
- Render: the engine such as EEVEE or Cycles, and quality.
- Output: resolution, frame range, file format.
- View Layer: which layers and passes render.
- Scene: active camera, units, gravity.
- World: background, sky, ambient light.
 Image: Blender Manual (CC BY-SA 4.0)
The Scene and Render tabs are always present because a scene always exists, and the Tool tab is always present because a workspace and active tool always exist. It helps to locate tabs by their icon shape rather than by text labels. One further always-present tab sits just below World: the Collection tab, marked by an interlocking-boxes icon, which holds settings for the active collection. Its details are set aside here to keep the two-group structure clear, but it is worth noting so that no tab appears to be missing.
The tab column: object group
The lower group describes the active object, the one drawn with the light outline. In order, these tabs are Object (transform, visibility, name), Modifiers (non-destructive effects, marked by a wrench), Particles (hair and particle systems), Physics (cloth, soft body, collision, fluid), Object Constraints (limit or link motion), Object Data (the mesh, curve, camera, or light data), and finally Material and Texture for surface look, with Texture at the very bottom. This ordering is the central concept of the lecture. The key term is active: these tabs follow whichever object was selected last. The Object Data tab changes its icon with the object type, showing a green triangle for a mesh, a camera body for a camera, and a light bulb for a light.
Figure: the top-to-bottom order of the object-group tabs.
graph TD
  A["Object (orange square)"] --> B["Modifiers (wrench)"]
  B --> C["Particles"]
  C --> D["Physics"]
  D --> E["Object Constraints"]
  E --> F["Object Data (green triangle)"]
  F --> G["Material (sphere)"]
  G --> H["Texture (checker)"]
Tabs are context-sensitive
Blender shows only the tabs that apply to the active object. Select a mesh and you get Modifiers, Physics, and Material. Select a camera and those disappear, because a camera has no surface to shade. The same is true of a light, which needs no Material tab because it emits light rather than receiving a surface material. The Object Data tab changes both its icon and its contents by type. When no object is active, only the top scene tabs remain. This is a common point of confusion for beginners, who assume tabs have vanished when in fact those tabs simply do not apply.
Figure: which tabs appear for each active object type.
graph TD
  Q{"Active object type?"} -->|Mesh| M["Full object tab set"]
  Q -->|Camera| C["Object, Constraints, Data only"]
  Q -->|Light| L["Object, Constraints, Data only"]
  Q -->|None| S["Scene tabs only"]
A tab is a view onto a data-block
Each tab edits one data-block, a named unit of data. An Object owns its transform, the Object links to Mesh data, and the Mesh links to Materials. Because these are separate linked blocks, two objects can share one mesh or one material: editing that shared mesh then changes both objects. The distinction between an Object and its Object Data is a real one that recurs in the Outliner and when linking duplicates. In short, tabs are views onto these shared blocks.
Figure: two objects sharing one mesh, which links to a material.
graph LR
  O["Object: Cube"] --> D["Mesh: Cube"]
  D --> MA["Material: Red"]
  O2["Object: Cube.001"] --> D
Reading a property panel
Inside a tab, settings are grouped into collapsible panels. Click a panel header to fold or unfold it; a triangle marks each panel header. Related fields sit together, such as those in the Transform panel, and you scroll with the mouse wheel to reach lower panels. Panel order and open state are stored per file. For example, the Object tab holds Transform, Relations, and Visibility panels, and the Transform panel in turn holds the Location, Rotation, and Scale fields. These same Transform values also appear in the Sidebar, which motivates the later comparison.
Figure: the Object tab, its panels, and the Transform fields.
graph TD
  T["Object tab"] --> P1["Transform panel"]
  T --> P2["Relations panel"]
  T --> P3["Visibility panel"]
  P1 --> F["Location, Rotation, Scale fields"]
Editing a field
Several field types appear in every tab:
| Field type | How to use it |
|---|---|
| Number field (scrub) | Click and drag left or right to scrub the value. |
| Number field (type) | Single click to type an exact value. |
| Slider | Drag for values with a fixed range. |
| Checkbox | Click to toggle on or off. |
| Drop-down | Click to pick from a list. |
| Colour swatch | Click to open the colour picker. |
Press Tab to jump to the next field, and Enter to confirm a typed value. Number fields also accept simple arithmetic, so typing 1 plus 1 evaluates to 2. Ctrl C and Ctrl V copy and paste a value between fields, and right-clicking a field opens a context menu that includes Reset to Default.
Hands-on: change the cube's size and colour
To practise, click the default cube so it is the active object. Open the Object tab and unfold Transform. Click the Scale X field, type 2, and press Enter. Then open the Material tab and press New to add a material. Finally click the Base Color swatch and pick a colour. A common error is that nothing appears in the Material tab because no object is active, so an active object must be confirmed first. If the Base Color does not seem to change the viewport, remember that Material Preview or Rendered shading is required to display it.
Properties editor versus Sidebar
The Properties editor is the global hub for all data: every tab and data-block, covering render, world, physics, and materials, and it lives in its own editor region. The Sidebar, by contrast, is a quick panel inside an editor, opened with N in the 3D Viewport, offering Item, Tool, and View tabs for fast access to transform while modelling. The Sidebar Item tab shows the same Location, Rotation, and Scale as the Properties Object tab, because both read the same data-block, so editing one updates the other immediately. Use the Sidebar for quick transform adjustments without leaving the viewport, and the Properties editor for full access to all settings. Pressing N toggles the Sidebar in and out of view.
When a tab is missing
If you cannot find a setting, check three things in order. First, is the right object active? Tabs follow selection. Second, is the object the right type for that tab? Third, is the panel folded? Unfold every triangle. Most missing settings result from the wrong active object or a folded panel. A tab is not gone; it simply does not apply to the current object. Clicking empty space to deselect makes the object tabs disappear, which demonstrates the point directly.
Figure: the checklist for finding a setting that is not visible.
graph TD
  A{"Setting not visible?"} --> B["Reselect the object"]
  B --> C["Confirm object type"]
  C --> D["Unfold the panel"]
  D --> E["Setting found"]
Summary
- The Properties editor is a full editor at the bottom right, with a vertical column of icon tabs, each swapping the panel below.
- Top-group tabs (Tool, Render, Output, View Layer, Scene, World, plus the always-present Collection) control the tool, scene, and render; lower-group tabs control the active object.
- Tabs are context-sensitive: they follow the active object and Blender shows only those that apply to its type, with Object Data changing icon and contents by type.
- Each tab is a view onto a data-block, and objects can share mesh or material data, so editing shared data affects multiple objects.
- Fields are edited by scrubbing, typing (arithmetic allowed), sliders, checkboxes, drop-downs, and colour swatches;
Tabmoves to the next field,Enterconfirms, and right-click offers Reset to Default. - The Sidebar (
Nin the 3D Viewport) is a quick shortcut to the same transform data-block that the Properties editor exposes in full.