
Before any modeling or animation can begin, a user must be able to read the Blender screen. At first glance the Blender 4.2 interface appears dense, but it is composed of a small number of repeating parts. Once those parts are named, the layout of the window becomes predictable and clear. This section provides a guided tour of the graphical interface: the window and its three top level pieces, the areas that tile it, the editors that fill those areas, the regions inside each editor, the header, the Topbar and the Status Bar, and finally the safe procedures for quitting and resetting the application. The four skills to acquire are naming the parts of the GUI and the default startup layout, explaining how areas, editors and regions nest, finding any menu in the Topbar and reading the Status Bar, and quitting Blender safely while resetting it to factory defaults. Competence with the window is a prerequisite for every later session.
What "GUI" Means Here
The GUI, or graphical user interface, is everything that is displayed on screen and can be selected. Blender opens as a single window on the operating system, and that window is filled edge to edge with panels. Unlike applications that scatter floating, overlapping toolboxes, Blender tiles its space so that nothing overlaps and every pixel belongs to some part of the layout. This tiling makes the layout predictable. At the top level, the window is composed of exactly three pieces: the Topbar at the top, the Areas in the middle that hold editors, and the Status Bar at the bottom.
Figure: the Blender window and its three top level pieces.
graph TD
  W[Blender Window] --> T[Topbar]
  W --> A[Areas with Editors]
  W --> S[Status Bar]
The Default Startup Layout
When Blender 4.2 opens it displays the Layout workspace. This layout contains a large 3D Viewport in the centre, and within the scene a Cube, a Camera and a Light. The default cube serves as a convenient test object. Around the viewport sit the other editors: the Outliner at the top right, the Properties editor at the bottom right, and the Timeline across the bottom. The startup file can be customised later, but this course assumes the shipped default.
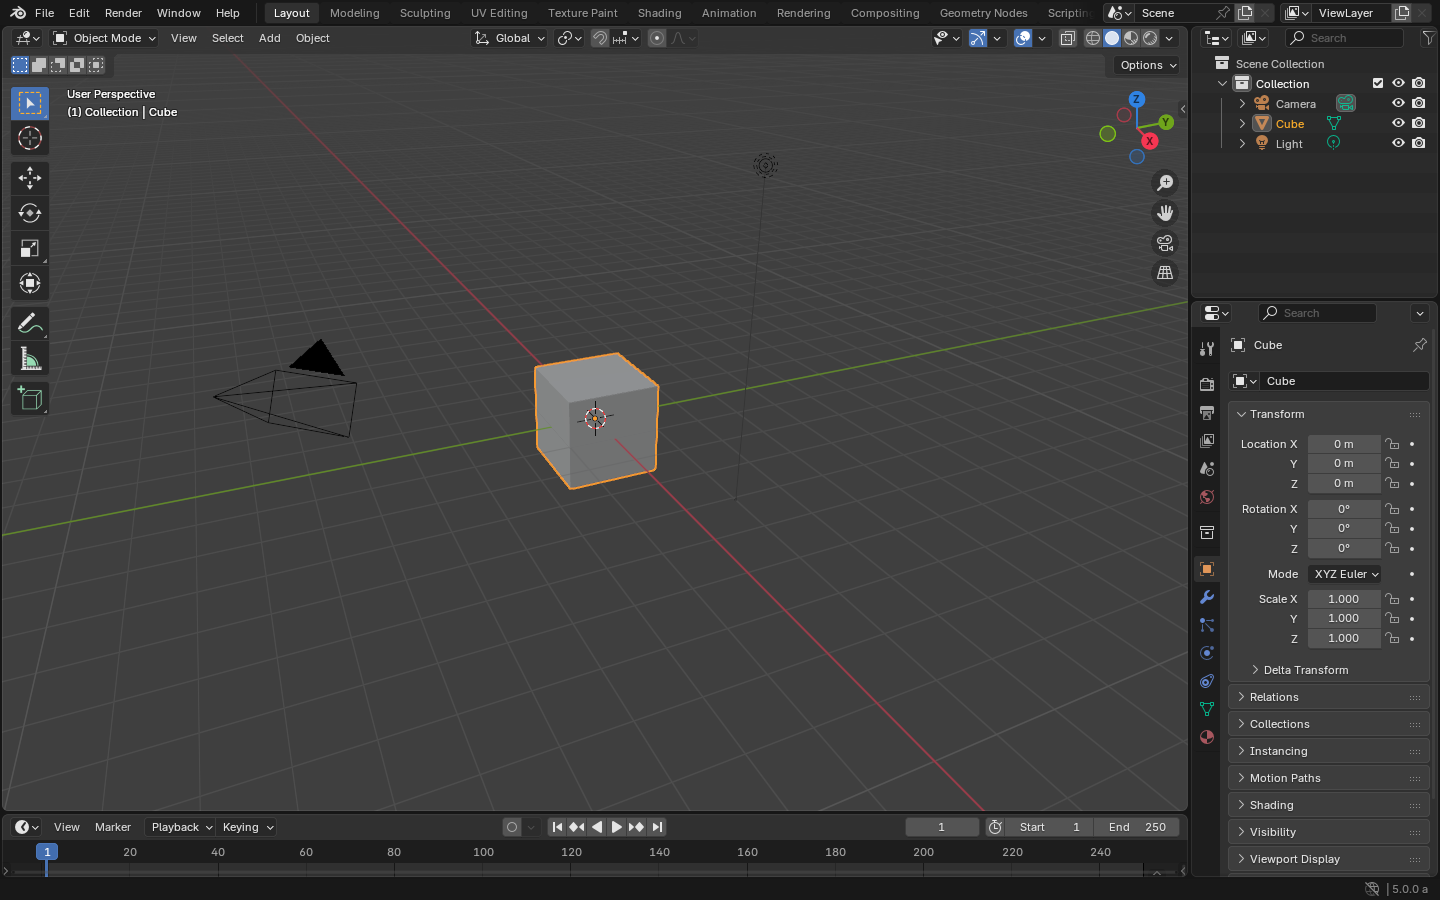 Image: Blender Manual (CC BY-SA 4.0)
Areas: The Tiles of the Window
An Area is a rectangle that reserves screen space for one editor. The window is divided into non overlapping areas, and each area holds exactly one editor at a time. The border between two areas can be dragged to resize them: when the cursor is hovered over a border it becomes a double arrow, and dragging then changes the relative sizes. Areas can also be split or joined, which is covered in the next topic. The essential idea is a separation of concerns: an area is a container, and an editor is the content placed inside it.
Figure: each area holds one editor.
graph LR
  A1[Area] --> E1[3D Viewport]
  A2[Area] --> E2[Outliner]
  A3[Area] --> E3[Properties]
Editors: What Fills an Area
An editor is the working tool displayed within an area. Three editors are visible in the default layout. The 3D Viewport is used to build and view the 3D scene. The Outliner is a tree list of everything in the scene. The Properties editor holds settings for the object, the scene and the render. Many additional editors exist, such as the Shader Editor, the Video Sequencer and the Timeline. The key point is flexibility: any area can be switched to display any editor using the Editor Type button at the far left of that area's header.
Regions: The Parts Inside an Editor
Every editor is itself divided into regions. The Header is a strip of menus and quick tools. The Main region is the primary working area. The Toolbar sits on the left and holds tools, toggled with the T key. The Sidebar sits on the right and holds panels, toggled with the N key. Regions are consistent across editors, so understanding them in one editor transfers to all others. One rule governs the shortcuts: the mouse must be hovering inside an editor for that editor's shortcut to apply, so pressing T or N affects whichever editor the pointer is currently over.
Figure: the regions that make up an editor.
graph TD
  ED[Editor] --> H[Header]
  ED --> TB[Toolbar, left, T]
  ED --> MR[Main Region]
  ED --> SB[Sidebar, right, N]
The Header
A Header is a thin horizontal strip belonging to an editor. It holds that editor's own menus and its common tools, and it sits at either the top or the bottom of the area. Right clicking the header allows it to be moved from top to bottom or back. Every editor has its own header, and it is important to distinguish the editor header from the Topbar: the Topbar belongs to the whole window, whereas each editor header carries menus specific to that editor. In the 3D Viewport header, for example, the menus include View, Select, Add and Object.
Figure: a header can sit at the top or the bottom of the area.
graph TD
  A[Editor Area] --> HT[Header at top]
  A --> M[Main Region]
  A --> HB[Header at bottom]
  HT -.- note1[choose one position]
  HB -.- note1
The Topbar
The Topbar runs across the very top of the window and applies to the whole application. On its left are the global menus, in the middle are the Workspace tabs, and on the right are the active Scene and View Layer selectors. The global menus, from left to right, are the Blender icon, File, Edit, Render, Window and Help. Their contents are as follows. The Blender icon opens the splash screen and About. File covers open, save, import, export, new and quit. Edit covers undo, redo and Preferences. Render covers render image and render animation. Window covers new window, fullscreen and screenshots. Help covers the manual and reports.
 Image: Blender Manual (CC BY-SA 4.0)
Workspace Tabs
A workspace is a saved arrangement of areas and editors. The Layout tab is for general scene building and viewing, the Modeling tab arranges tools for editing geometry, and the Animation tab sets up the timeline and views for motion. Further tabs include Sculpting, UV Editing, Texture Paint, Shading, Rendering, Compositing, Geometry Nodes and Scripting. Switching tabs is safe and reversible: it does not change the scene, only what is displayed, so the same cube appears in each of these different working layouts.
The Status Bar
The Status Bar sits at the very bottom of the window. It shows contextual keyboard shortcuts for whatever the mouse is hovering over, and it indicates which mouse buttons are active in the current context. It also displays messages and progress, such as during rendering, and it can show scene statistics such as object counts. Right clicking the Status Bar lets the user choose what it displays. When uncertain what an action will do, the Status Bar is the first place to look, and its hints update as different tools are hovered.
 Image: Blender Manual (CC BY-SA 4.0)
Practical: Quitting, Resetting and Saving
The main file and reset commands are summarised below.
| Action | Menu path | Shortcut |
|---|---|---|
| Save current file | File > Save | Ctrl S |
| New file | File > New (choose General) | Ctrl N |
| Quit | File > Quit | Ctrl Q |
| Reset all customisation | File > Defaults > Load Factory Settings | none |
To quit Blender, use File > Quit or press Ctrl Q. If there are unsaved changes, Blender shows a Save prompt before closing, and an asterisk in the window title bar signals unsaved edits. To begin a new file, use File > New and select a template such as General. To remove all customisation, use File > Defaults > Load Factory Settings; this discards saved defaults for the session and resets the entire interface, and Blender requests confirmation before it resets.
Blender never discards unsaved work silently. Closing with unsaved edits triggers a dialog offering Save, Don't Save, or Cancel. Choosing Save writes the file then closes, Don't Save closes without writing, and Cancel returns to work. Ctrl S saves at any time to the current file, and Ctrl N starts a new file while first prompting to save. The recommended practice is to press Ctrl S frequently: the save prompt is a safeguard, not a substitute for saving. Blender also keeps auto save quit.blend files, but these should be treated only as a fallback.
Figure: the save-on-quit decision.
graph TD
  Q[Ctrl Q or File Quit] --> C{Unsaved changes?}
  C -->|Yes| D[Save dialog]
  C -->|No| X[Blender closes]
  D --> S[Save] --> X
  D --> ND[Don't Save] --> X
  D --> CA[Cancel] --> B[Back to work]
Summary
- The Blender window has three top level parts: the Topbar at the top, tiled Areas of editors in the middle, and the Status Bar at the bottom, with no overlapping panels.
- Areas nest into editors, and editors nest into regions: an area is a container, an editor is its content, and each editor contains a Header, a Main region, a Toolbar toggled with
T, and a Sidebar toggled withN. - Each editor has its own Header with editor specific menus, while the Topbar carries the global menus (Blender icon, File, Edit, Render, Window, Help), Workspace tabs, and Scene and View Layer selectors.
- Workspaces are saved layouts that change only what is displayed, not the scene, and switching between them is safe and reversible.
- The Status Bar reports contextual shortcuts, messages, progress and statistics, and is the place to consult when unsure of an action.
- Quit safely with
Ctrl Q, respond to the Save dialog, save often withCtrl S, and reset all customisation with File > Defaults > Load Factory Settings.