
The 3D Viewport, also called the 3D View editor, is the large central area of Blender and the editor in which scenes are viewed and constructed. It is the most frequently used editor in the application, so confident navigation here supports every later topic in the course. A helpful reference point is camera movement in a 3D video game: navigating the viewport is essentially moving a virtual camera around the scene. This section establishes viewport navigation, view alignment, and shading before any modelling begins.
Learning outcomes
By the end of this session you should be able to name the default scene objects (cube, camera, light), orbit, pan, and zoom using both the mouse and the numpad, switch to front, side, top, and camera views using the numpad, read the viewport header menus and the mode selector, and switch shading modes while toggling between perspective and orthographic projection. A hands-on drill near the end of the session assesses each of these outcomes.
The default scene
When Blender opens, the scene contains three objects. The Cube is a starter mesh that can be edited or deleted; it is a placeholder and is often removed. The Camera defines the final render view and therefore determines the content of the final image. The Light is a point light that illuminates the scene. The dark centre point is the 3D Cursor, and new objects are created at its location. The grid floor represents the X and Y ground plane, while Z is the vertical axis. Each object can be identified both in the viewport and in the Outliner.
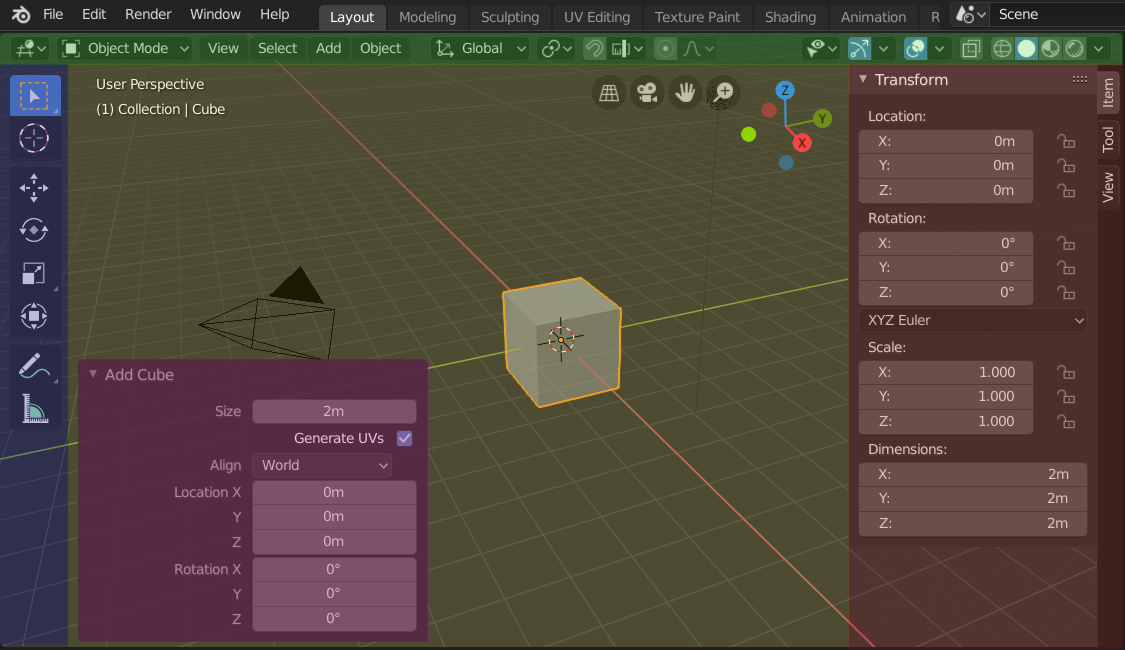 Image: Blender Manual (CC BY-SA 4.0)
Navigation with the mouse
Three motions cover most navigation. Orbit is performed by dragging with the middle mouse button; it rotates around the centre of the view, not around the selected object by default. Pan is done by holding Shift and dragging the middle mouse button. Zoom uses the scroll wheel, or Ctrl and a middle mouse drag. On a mouse without a middle button, enable Emulate 3 Button Mouse in Preferences. For laptop trackpad users, a two finger drag orbits, and with Emulate 3 Button Mouse enabled, Alt and a left drag also orbits.
Figure: mouse buttons mapped to orbit, pan, and zoom.
graph LR
  MMB[Middle Mouse] --> O[Orbit]
  SMMB["Shift and Middle Mouse"] --> P[Pan]
  W[Scroll Wheel] --> Z[Zoom]
Navigation with the gizmo and menus
The viewport also provides on-screen navigation controls. The navigation gizmo, the axis ball at the top right, orbits when dragged. Its magnifier icon zooms and its hand icon pans. The View menu holds every navigation command. View > Frame Selected (Numpad .) centres the view on the selected object and is useful for recovering the view after navigating into empty space. View > Frame All (Home) fits the whole scene into the view. The gizmo is accessible for beginners but slower than the mouse, so the middle mouse button should be preferred as skill develops.
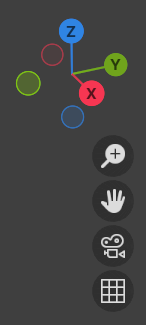 Image: Blender Manual (CC BY-SA 4.0)
Numpad: aligned views
The numpad provides precise aligned views that are fundamental to accurate modelling.
| Shortcut | View | Looks along |
|---|---|---|
Numpad 1 | Front | positive Y axis |
Numpad 3 | Right side | negative X axis |
Numpad 7 | Top | negative Z axis |
Numpad 0 | Camera | through the camera |
Holding Ctrl with Numpad 1, Numpad 3, or Numpad 7 gives the opposite side: back, left, and bottom. Students without a numpad can enable Emulate Numpad in Preferences so that the top row number keys perform these functions. Note that this reassigns the collection visibility hotkeys, the 1 to 9 keys that show or hide collections.
Numpad: orbit and pan in steps
The numpad also nudges the view in fixed steps, which allows small, precise adjustments without drift. Numpad 8 and Numpad 2 orbit up and down. Numpad 4 and Numpad 6 orbit left and right. Numpad + and Numpad - zoom in and out. Numpad 5 toggles between perspective and orthographic projection, switching the grid between converging perspective lines and flat orthographic parallel lines.
Figure: the numpad navigation controls grouped by function.
graph TD
  N[Numpad] --> ORB["8 2 4 6 orbit steps"]
  N --> ZM["Plus / Minus zoom"]
  N --> P5["5 toggles projection"]
  N --> VIEWS["1 3 7 aligned views"]
Optional: Walk and Fly
For first person navigation, use Walk or Fly mode, opened from View > Navigation > Walk Navigation (shortcut Shift and the backtick key). Movement uses the W A S D keys with the mouse controlling where you look, Q and E move down and up, Left Click confirms, and Esc or Right Click cancels. This mode is optional and is useful for exploring large scenes, such as moving through a constructed room. Fly mode is similar but momentum based.
Figure: reaching Walk and Fly navigation from the View menu.
graph LR
  V[View menu] --> NAV[Navigation]
  NAV --> WALK[Walk Navigation]
  NAV --> FLY[Fly Navigation]
  WALK --> WASD["WASD keys and mouse look"]
The viewport header
The strip across the top of the editor contains menus and toggles. View holds navigation, cameras, and framing. Select holds selection tools and options. Add inserts new objects (Shift A), a frequently used shortcut. Object acts on the selected objects. The menu list changes with the current mode; this set corresponds to Object Mode. The far right of the header holds the shading buttons together with the overlay and gizmo toggles.
 Image: Blender Manual (CC BY-SA 4.0)
The mode selector
The leftmost header dropdown sets what is being edited. Object Mode is used to move, rotate, and scale whole objects. Edit Mode is used to change vertices, edges, and faces. Other modes include Sculpt, Vertex Paint, and Weight Paint, among others. Tab swaps between Object and Edit Mode, and Ctrl Tab opens a pie menu of all modes. Modes determine which tools appear, so a common beginner error is attempting to move a vertex while in Object Mode, or the reverse. The available modes depend on the selected object type; for example, a camera has no Edit Mode.
Figure: the mode selector and the Tab swap between Object and Edit Mode.
graph TD
  MS[Mode Selector] --> OM[Object Mode]
  MS --> EM[Edit Mode]
  MS --> SC[Sculpt Mode]
  MS --> MORE[More modes...]
  OM -->|Tab| EM
Shading modes
Four sphere icon buttons at the top right of the header set the shading mode. Wireframe shows edges only and lets you see through everything. Solid shows flat shaded geometry with no materials and is the efficient default for modelling. Material Preview shows materials lit by a studio HDRI using Eevee, allowing materials to be evaluated without configuring lights. Rendered shows the full scene lighting via the render engine, Cycles or Eevee, giving the final result but demanding more of the machine. Press Z for the shading pie menu, and Shift Z to toggle Wireframe on and off.
Perspective versus orthographic
Two methods project the 3D scene onto the flat screen. In perspective, distant objects appear smaller and parallel lines converge, which is realistic and approximates human vision. A real world example is railway tracks that appear to meet at the horizon. In orthographic, there is no size reduction with distance and parallel lines remain parallel, which suits measuring and aligning and is why engineers and modellers use it for accurate work. Toggle between the two with Numpad 5. The aligned views Numpad 1, Numpad 3, and Numpad 7 switch to orthographic for exact alignment. Cameras render in perspective by default, and the text in the top left corner of the header indicates the current projection.
Figure: perspective versus orthographic and the Numpad 5 toggle.
graph TD
  P[Perspective] --> R[Approximates human vision]
  O[Orthographic] --> M[Suited to measuring and aligning]
  N5["Numpad 5 toggles"] --> P
  N5 --> O
Hands-on: a navigation drill
To practise, orbit around the cube with the middle mouse button, then press Numpad 1, Numpad 3, and Numpad 7 in turn. Press Numpad 5 and watch perspective flip to orthographic. Press Numpad 0 to look through the camera. Finally, cycle shading with Z, trying Solid and then Rendered. Common issues are the absence of a numpad, resolved by enabling Emulate Numpad, and a laptop trackpad, resolved by enabling Emulate 3 Button Mouse. A lost view can be recovered with Frame Selected, Numpad ..
Summary
- The default scene holds a cube, a camera, and a light, with new objects created at the 3D Cursor; the grid is the X and Y plane and Z is vertical.
- The mouse handles most navigation: orbit with the middle mouse button, pan with
Shiftand middle mouse, zoom with the scroll wheel. - The numpad gives aligned orthographic views (
Numpad 1front,Numpad 3right,Numpad 7top,Numpad 0camera) and step orbit, zoom, and theNumpad 5projection toggle. - The header menus (View, Select, Add, Object) and the mode selector determine available tools;
Tabswaps Object and Edit Mode. - The four shading modes are Wireframe, Solid, Material Preview, and Rendered, accessed via the
Zpie menu. - Perspective approximates human vision while orthographic keeps parallel lines parallel for precise work; toggle with
Numpad 5.