
Every panel you see in Blender is an interchangeable editor, and any panel can be switched to any other editor at any time. This section explains how that switching works and then focuses on one particular editor, the Outliner, which acts as the table of contents for the whole scene. A useful first demonstration is to click the top-left icon of the 3D Viewport and watch the area turn into a different editor. The important takeaway from the outset is that switching editors changes only the tool shown, never the underlying scene data.
Learning outcomes
By the end of the session you should be able to find and use the editor-type selector in any header, name the main editors and state what each is for, read the scene hierarchy in the Outliner (collections, objects, and their data), and use the Outliner's visibility, selectability, and render toggles along with its filter and display modes. The session concludes with a hands-on exercise in the Outliner. Many beginners have clicked the editor-type icon in the top-left corner by accident and been surprised by the result, so it is worth repeating that switching editors does not alter data.
What is an editor
An area is a rectangle of the window. The editor is the tool shown inside that rectangle. The two ideas are distinct: the area is the space, the editor is the content. Any area can host any editor. The header sits at the top or bottom of the area, and the editor-type selector is the first button in that header. Crucially, switching editors never touches your data.
The default layout is not fixed. The large central area holds the 3D Viewport by default, but it can host any editor just as well. A typical window might show the 3D Viewport in the top-left area, the Outliner and Properties on the right, and the Timeline along the bottom, but none of these assignments is permanent.
Figure: the Blender window splits into areas, and each area hosts an editor.
graph TD
  W[Blender window] --> A1[Area: top-left]
  W --> A2[Area: right]
  W --> A3[Area: bottom]
  A1 --> E1[3D Viewport editor]
  A2 --> E2[Outliner + Properties]
  A3 --> E3[Timeline editor]
The editor-type selector
The editor-type selector is the first icon at the left end of every editor's header. Click it to open a categorised menu whose groups are General, Animation, Scripting, and Data. Pick an editor from the menu to replace whatever fills that area. There is also a keyboard shortcut: hover the pointer over an area and press Shift F5 for the 3D Viewport, with similar Shift F keys for other editors. The shortcuts are supplementary and need not be memorized in this session; the icon is the reliable path. A quick live check is to click the selector in the Outliner, switch it to a Shader Editor, and then switch it back, noting the four category headings inside the dropdown.
Figure: the first header icon opens a dropdown grouped into General, Animation, Scripting, and Data.
graph LR
  H["Header: [icon] View  Select  Add ..."] --> S["First icon = editor-type selector"]
  S --> M[Dropdown menu]
  M --> G[General]
  M --> An[Animation]
  M --> Sc[Scripting]
  M --> Da[Data]
A tour of the editors: General
The General group contains the editors used most during the modelling and shading weeks. The 3D Viewport is where you model, sculpt, and view the scene in 3D. The Image Editor and UV Editor let you view and paint images and lay out UV maps onto a texture. The Shader Editor builds materials as node graphs for surfaces. The Video Sequencer, Movie Clip Editor, Compositor, and Geometry Node Editor also belong to this group and are covered in later sessions.
A tour of the editors: Animation, Scripting, and Data
The remaining editors are organised by task. The Animation group holds the Timeline, Dope Sheet, Graph Editor, Drivers, and Nonlinear Animation. The Scripting group holds the Text Editor, Python Console, and Info. The Data group holds the Outliner, Properties, File Browser, Asset Browser, Spreadsheet, and Preferences. The Timeline plays your animation and is covered in the animation unit, while the Properties and Outliner, the two focus editors for this session, both live in the Data group. There is no need to learn each editor in detail; the key point is that tools are grouped by the task they serve.
Meet the Outliner
The Outliner is a tree view of everything in your file, in effect the table of contents of the blend file. It shows the scene hierarchy as a list. The top level is the Scene Collection, which is the root beneath which every element resides. Inside sit collections and objects, and each object expands to its data, such as its mesh, material, and modifiers. Collections function like folders, objects are the items in the scene, and each object holds its own data-blocks.
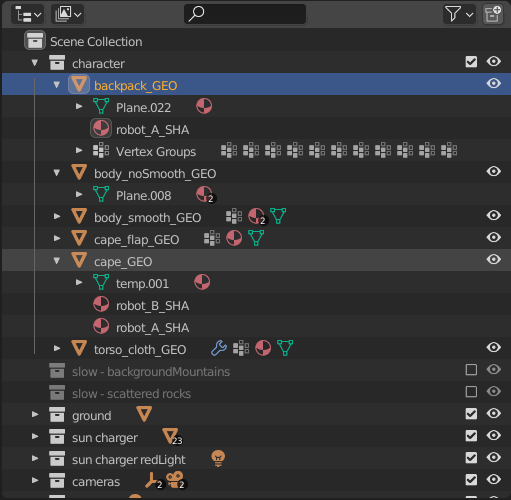 Image: Blender Manual (CC BY-SA 4.0)
Collections, objects, and data
Three levels of the hierarchy deserve clear definitions. A collection is a named group, like a folder; it organises items and can be toggled as one unit. An object is a thing in the scene, such as a mesh, camera, or light, and it has a position. Object data is what the object is made of: the mesh, material, and modifiers.
An object and its data are separate, and this separation is a recurring concept in Blender. The object is the container that carries a transform, while the data-block is the geometry itself. Because of this split, two objects can share one mesh data-block. This is the basis of linked duplicates, in which one mesh is shared across many objects. It is presented here briefly as a preview rather than in full detail.
Expanding, collapsing, and selecting
To expand or collapse a row, click the small triangle to its left. Clicking an item's name selects that object, and the selection also appears in the 3D Viewport. Use Ctrl Click to add to the selection and Shift Click to select a range. To frame the selected object, place the mouse over the Viewport and press . (Numpad .). Selection in the Outliner and the Viewport stays synchronized when Sync Selection is enabled in the filter menu, which is the default. The framing shortcut reduces navigation time in complex scenes.
The restriction toggles
On the right of each row sit toggle icons that restrict what an object can do. The eye hides the object in the Viewport for the current view layer. The cursor arrow disables selection. The monitor disables the object in viewports across all layers. The camera disables the object in renders.
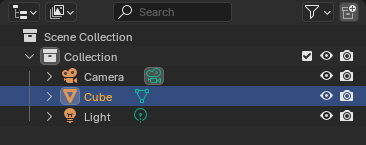 Image: Blender Manual (CC BY-SA 4.0)
Beginners most often confuse the eye and the camera. The eye is a quick show or hide for the working view only. The camera icon controls the render output, so an object can be visible in the viewport yet excluded from the render, or the reverse. The cursor arrow makes an object non-selectable, which prevents accidental selection. Not all of these icons appear by default; enabling them is covered next.
Filter and display modes
Two controls sit in the Outliner header. The funnel icon opens the filter, where you choose which toggles show, set sorting, and enable Sync Selection. The display-mode dropdown changes what the tree lists. A search box filters the tree by name, and Ctrl F focuses it.
The display modes include View Layer, Scenes, Blender File, Data API, Library Overrides, and Unused Data. The default is View Layer, which is appropriate for beginners. Blender File shows every data-block with its user count, and Data API provides the detailed Python view. Opening the funnel menu lets you enable the Disable Selection toggle so that its icon appears on each row.
Figure: the display-mode dropdown and the options it offers.
graph TD
  DM[Display mode] --> VL[View Layer]
  DM --> SC[Scenes]
  DM --> BF[Blender File]
  DM --> DA[Data API]
  DM --> LO[Library Overrides]
  DM --> UD[Unused Data]
Hands-on: tidy a scene in the Outliner
This exercise applies every concept from the session. First, switch the top-right area to the Outliner using the editor-type selector. Next, right-click the Scene Collection, choose New Collection, and rename it to Props; a collection can be renamed by double-clicking its name. Then drag the default Cube into Props to reparent it, which is the core organising skill. Click the Cube's eye to hide it, then click again to show it. Finally, open the funnel, enable Disable Selection, and lock the Cube with the cursor icon; attempt to click the cube in the viewport to confirm it cannot be selected, then unlock it.
Summary
- An area is a rectangle of the window and the editor is the tool inside it; any area can host any editor, and switching editors never changes scene data.
- The editor-type selector is the first icon in any header; its menu is grouped into General, Animation, Scripting, and Data, and
Shift Fkeys offer optional shortcuts. - The Outliner is a tree view of the file with the Scene Collection at the root, holding collections, objects, and each object's data-blocks.
- An object and its data are separate, which allows two objects to share one mesh data-block through linked duplicates.
- Row toggles restrict objects: the eye hides in the working viewport while the camera controls render output, and the cursor arrow disables selection.
- The header funnel sets which toggles, sorting, and Sync Selection are active, the display-mode dropdown changes what the tree lists (default View Layer), and the search box (
Ctrl F) filters by name.