
This session establishes a common tool for the whole course: Blender 4.2 LTS, installed and running on every machine. The aim is that by the end of the session each student can open Blender 4.2 LTS to the splash screen, regardless of their operating system. Working from a single shared version keeps the course notes and manual screenshots aligned with what every student sees on screen. These are practical objectives rather than theory, and each student should complete all four learning outcomes before the session ends: define Blender and identify its role in animation and games, explain the LTS release model and the rationale for targeting 4.2, download and install Blender on Windows, macOS, or Linux, and finally launch Blender, interpret the splash screen, and locate the user files.
What Blender is and where it fits
Blender is a free, open-source 3D creation suite. The key word is suite: many commercial tools address a single task, whereas Blender covers the full production pipeline in one application. Within Blender you can perform modelling, sculpting, and texturing, animation and rigging, physics simulation such as cloth, fluid, and soft body, and rendering, compositing, and video editing. There is no license fee, no watermark, and no trial limit. It is developed by the Blender Foundation and funded by donations and sponsors rather than license sales.
Figure: the Blender pipeline, where modelling, animation, simulation, and rendering all feed one final image or video.
graph TD
  B[Blender] --> M[Model]
  B --> A[Animate]
  B --> S[Simulate]
  B --> R[Render]
  M --> O[Final image or video]
  A --> O
  S --> O
  R --> O
Blender is used across indie games, short films, product visualisation, and VFX. Three broad areas map onto this course. In animation and film, Blender handles character animation, motion graphics, and short films, which is the focus of Unit 4. In games, you model and rig assets, bake textures, then export to a game engine such as Unity or Godot: a game engine renders in real time, whereas Blender is where the assets are first built. In simulation and VFX, Blender produces cloth, fluids, smoke, and particles, which is the focus of Unit 5. In this course, most work occurs within Blender for both building and playback.
Versions and the LTS model
Blender ships two kinds of releases. Regular releases add new features every few months. LTS, meaning Long Term Support, receives bug fixes for two years and no new features, only stability updates. This course targets 4.2 LTS, which is supported to July 2026 and was the first LTS in the 4.x series.
The rationale for fixing a version is practical. If part of the class runs 4.5 and part runs 4.2, keyboard shortcuts and menu names diverge, and the manual screenshots no longer match. LTS is the appropriate classroom choice because it does not change during the semester, whereas a newer regular build has the latest features but menus that may differ. Students should not install the newest regular build.
Figure: why the course chooses 4.2 LTS over a newer regular build.
graph LR
  A[4.2 LTS<br/>stable, 2 yr fixes] --> C[We use this]
  B[Newer regular<br/>latest features] --> D[Menus may differ]
System requirements
Blender's published minimum and recommended values come from blender.org/download/requirements.
| Component | Minimum | Recommended |
|---|---|---|
| CPU | 64-bit with SSE4.2 | Multi-core 64-bit |
| RAM | 8 GB | 32 GB |
| Display | 1920 by 1080 | Full HD or larger |
| GPU | 2 GB with OpenGL 4.3 | 8 GB dedicated VRAM |
Students on modest laptops can be reassured that Blender opens and models effectively on the minimum specification. Only heavy simulation and rendering require the recommended specification. A three-button mouse, or a scroll wheel that clicks, makes navigation considerably easier than a trackpad, because the middle mouse button is used frequently for orbiting the view. An external mouse is therefore the most cost-effective upgrade. Trackpad users can rely on the emulate-3-button-mouse option, which is covered in a later topic.
Downloading from blender.org
Always download from the official site, blender.org/download/lts/4-2. The site auto-detects the operating system, and you should select the correct OS if the detection is wrong. Do not use unofficial mirror or advertisement sites, because imitation sites bundle adware with a fake installer. Trust only blender.org. Downloads are free and require no account or paid tier, which differs from typical trial software. The file size is a few hundred MB, so campus wifi is advisable where data is limited.
Figure: navigating from blender.org to the correct build for your operating system.
graph TD
  A[blender.org] --> B[Download menu]
  B --> C[LTS]
  C --> D[Blender 4.2 LTS]
  D --> E{Your OS?}
  E --> W[Windows]
  E --> M[macOS]
  E --> L[Linux]
Installing per platform
On Windows there are three routes. The installer (.msi) is double-clicked and follows a wizard that adds Start menu entries and file associations; it is recommended for most students and for lab or personal machines with admin rights. The portable zip (.zip) is unzipped to any location and run via blender.exe, needing no installation and no admin rights, and it runs from a USB drive; this is the preferred option for restricted campus computers where software cannot be installed. The Microsoft Store or Steam builds install and update automatically, but may not remain fixed on 4.2 LTS, so the direct download is preferable for this class.
On macOS, download the .dmg for your chip, either Apple Silicon (M1 to M4) or Intel, which you can identify via the Apple menu, About This Mac. Open the .dmg, then drag Blender into the Applications folder. On first launch, right-click the app and choose Open to clear the Gatekeeper security prompt for an application downloaded from the internet. Eject the disk image once the copy finishes. The most common macOS error is running Blender from inside the mounted dmg rather than copying it to Applications first, which causes it to disappear on restart, so the drag-to-Applications step matters.
On Linux there are two reliable options. The portable tar.xz from blender.org is extracted and run via ./blender; it is vendor-neutral, always exactly 4.2 LTS, and the most reliable route because it is the same build the Foundation ships. Alternatively, Snap via snap install blender --classic is acceptable and updates cleanly. Steam also supports auto-updates. Distribution package managers such as apt or dnf may lag behind on version, so avoid them where 4.2 is specifically required. Few students are likely to be on Linux, so pairing is an option where needed.
Figure: the Linux install options, with the tar.xz route extracted then run directly.
graph TD
  A[Linux] --> B[tar.xz from blender.org]
  A --> C[Snap store]
  A --> D[Steam]
  B --> E[Extract then run ./blender]
Hands-on install and launch
The hands-on procedure has four steps. Open blender.org/download/lts/4-2 and download the build for your OS. Install using the method for your platform. Launch Blender and wait for the splash screen to appear. Finally, save a scene with Ctrl S to confirm everything works, then close it. If Blender opens to a grey cube on a grid floor, the installation is complete: the default cube confirms that the GPU and OpenGL are functioning. Common obstacles are no admin rights (use portable), Gatekeeper on macOS (right-click Open), and slow wifi (share a USB drive with the installer).
The splash screen and default interface
The splash appears at every launch. It offers New File presets: General, 2D Animation, Sculpting, VFX, and Video Editing. A Recent Files list on the right allows quick reopening once projects have been saved. The version number is shown, and students should confirm it reads 4.2 to catch anyone who installed the wrong build. The splash also links to the manual and release notes, and clicking anywhere off the splash dismisses it. It can be reopened from the Blender menu, Splash Screen. For this course, work almost always begins from the General preset.
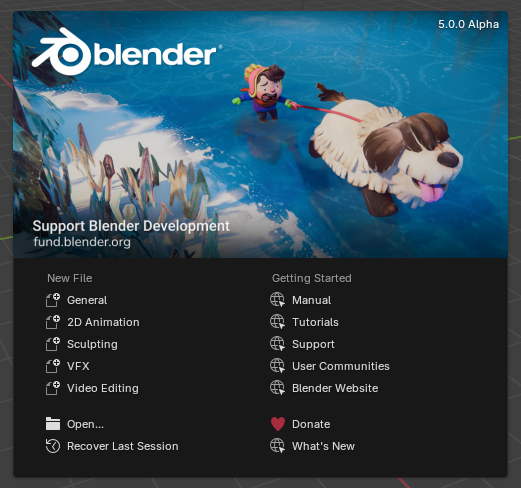 Image: Blender Manual (CC BY-SA 4.0)
Dismissing the splash reveals the default workspace. A single 3D Viewport fills most of the window, and the default scene contains a cube, a camera, and a light. The Toolbar sits on the left of the viewport, the Outliner and Properties editors sit on the right, and the Timeline runs along the bottom. These four regions are identified at a high level here; the detailed interface tour and navigation are deferred to the next session.
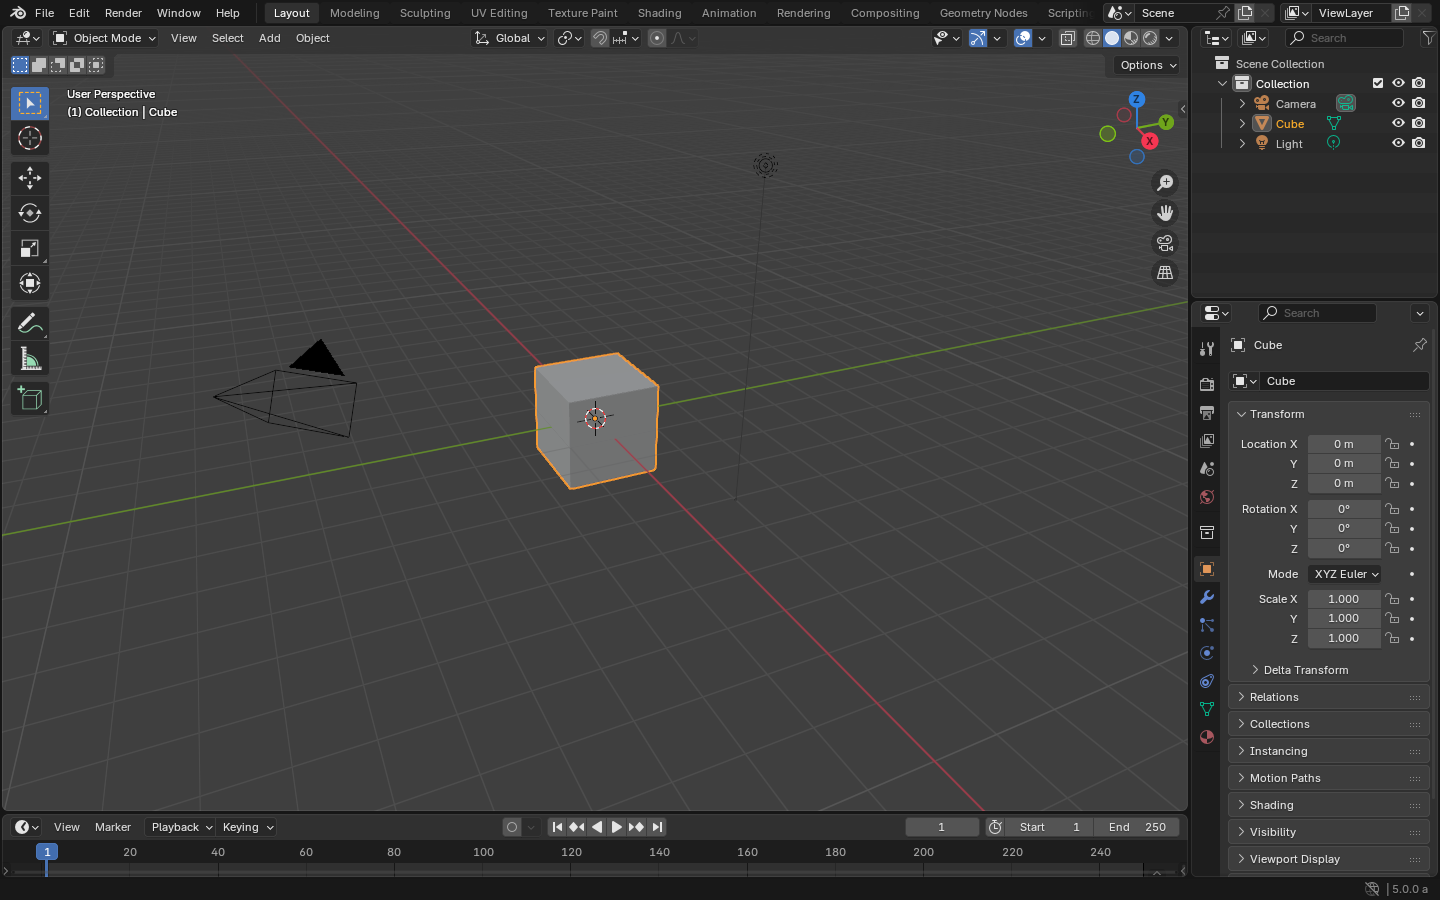 Image: Blender Manual (CC BY-SA 4.0)
Keeping Blender up to date and where user files live
For a course, stability is prioritised over new features. Remain on 4.2 LTS for the full semester. LTS updates are bug fixes only, numbered 4.2.1, 4.2.2, and so on. These point releases have the same features with bug fixes, are entirely safe to install, and are obtained from the same LTS download page. Avoid moving to 4.3 or higher until the course ends, because a feature change can shift menus and invalidate the shared notes. Store and Steam builds may auto-update past 4.2, which is the trade-off for their convenience.
Figure: safe point releases within 4.2 versus the feature jump to 4.3 to avoid mid-course.
graph LR
  A[4.2.0] --> B[4.2.1<br/>safe fix]
  B --> C[4.2.2<br/>safe fix]
  C -.avoid mid-course.-> D[4.3 new features]
Blender stores user files in a version-specific folder: on Windows %APPDATA%\Blender Foundation\Blender\4.2\, on macOS ~/Library/Application Support/Blender/4.2/, and on Linux ~/.config/blender/4.2/. This folder holds the preferences, add-ons, and startup file. The 4.2 in the path signals that settings do not carry across major versions, a further reason to remain on 4.2. It is the folder to back up before reinstalling, and the folder to delete if Blender enters a broken state and a clean start is required, since deleting it resets Blender to factory defaults. Students need not memorise the paths, only know the folder exists and what it contains. On macOS the Library folder is hidden and is accessed via Finder, Go, while holding Option.
Summary
- Blender is a free, open-source 3D suite covering modelling, animation, simulation, rendering, compositing, and video editing, developed by the Blender Foundation and used in games, film, and VFX.
- The course fixes Blender 4.2 LTS, a Long Term Support release with two years of bug fixes and no new features, so shortcuts, menus, and manual screenshots stay aligned for the whole class.
- Always download from the official site blender.org/download/lts/4-2; choose the
.msior portable.zipon Windows, the.dmgon macOS, and thetar.xzor Snap on Linux, avoiding auto-updating Store or Steam builds. - A successful install launches to the splash screen showing version 4.2, then to the default scene with a cube, camera, and light, confirming the GPU and OpenGL work.
- Stay on 4.2 for the semester; only safe point releases such as 4.2.1 should be installed, and 4.3 or higher should be deferred until the course ends.
- User settings, add-ons, and the startup file live in a version-specific 4.2 folder that can be backed up or deleted to reset Blender to factory defaults.