
Blender Preferences
The Preferences window is where Blender is configured to match a given keyboard, mouse, and workflow. Most users eventually customise Blender, so it is useful to learn where the settings reside before modelling begins. This section covers how to open the Preferences window and name its main sections, how to enable and search for Add-ons, how to set Emulate Numpad and Emulate 3 Button Mouse for a laptop, and how auto-save works together with saving a custom Startup File. The material is particularly relevant to anyone working on a laptop without a numpad or a middle mouse button.
Opening Preferences
Preferences live in one dedicated window. The menu path is Edit then Preferences. In Blender 4.2 this item sits under Edit rather than File, unlike earlier versions. The window opens as a floating window rather than a full editor, so it can be moved aside while you continue working. Changes apply live as you click, and most changes require no explicit save action. When you are finished you simply close the window, and the settings persist across sessions.
Figure: the menu path from the top bar to the Preferences window.
graph LR
  A[Top menu bar] --> B[Edit]
  B --> C[Preferences]
  C --> D[Preferences window opens]
The Preferences window overview
Inside the window a vertical list of sections runs down the left side. Click one to see its settings displayed on the right. The sections are grouped by purpose from top to bottom. A search box at the top filters settings by keyword, and a menu at the bottom left provides save, load, and reset actions for preferences. There is a single window containing fourteen sections in total, of which only a few are needed in this session.
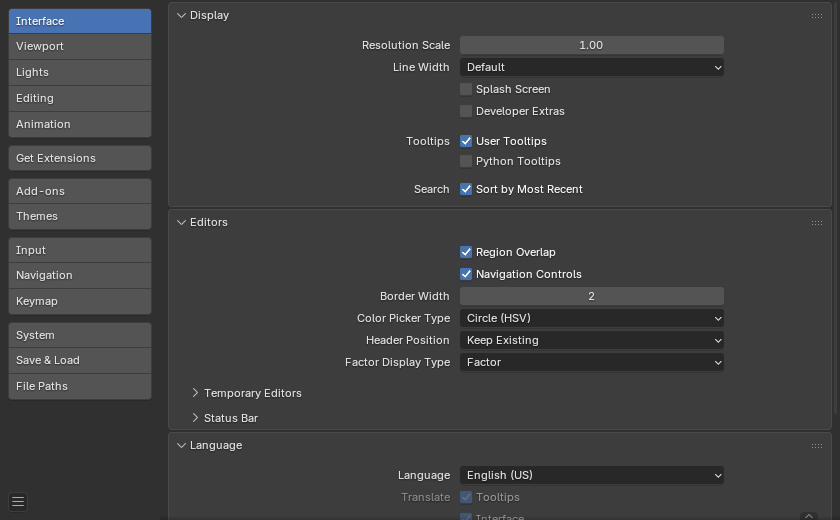 Image: Blender Manual (CC BY-SA 4.0)
The fourteen sections
The fourteen sections can be summarised as follows. Note for Blender 4.2 that Get Extensions is new: it is the online catalogue used to browse and install extensions, and it sits just above the classic Add-ons list. The sections most useful to beginners are Interface, Input, Add-ons, and Save & Load. The remaining sections can be consulted as needed.
| Section | Purpose |
|---|---|
| Interface | Language, tooltips, UI scale |
| Themes | Colours of the whole UI |
| Viewport | 3D View quality and display |
| Lights | Studio lights for solid shading |
| Editing | Undo steps, new object defaults |
| Animation | Timeline and playback options |
| Get Extensions | Browse and install extensions |
| Add-ons | Enable, disable, manage tools |
| Input | Mouse, keyboard, emulation |
| Navigation | Orbit, zoom, fly and walk |
| Keymap | Every shortcut, fully editable |
| System | GPU, memory, sound, network |
| Save & Load | Auto-save, blend file behaviour |
| File Paths | Where Blender looks for assets |
Appearance: Interface, Themes, Viewport
Three sections govern appearance. In Interface, the Resolution Scale can be raised to enlarge text, which is helpful when projector or classroom text is too small: setting it to about 1.2 makes the interface more readable. Interface also lets you toggle tooltips and Python tooltips. Themes offers extensive options, so it is best to pick a built-in preset, although any element can be recoloured individually. Viewport controls 3D View quality and display, including settings such as anti-aliasing samples and the Rotation gizmo display style.
Figure: what each appearance section controls.
graph TD
  A[Interface] -->|readability| B[UI scale, tooltips]
  C[Themes] -->|colour| D[Presets, per-element]
  E[Viewport] -->|3D View| F[Quality, gizmos]
Behaviour: Editing, Animation, Lights
Editing holds undo memory and the undo step count, along with defaults for new objects, such as whether a new mesh enters the scene with smooth shading. If undos are frequently exhausted, the number of undo steps can be increased here. Animation controls how the Timeline and playback behave, including the default interpolation applied to new keyframes. Lights is a common point of confusion: it refers to the studio and matcap lights used by Solid viewport shading for previews, not the lamps used in rendering or the lights placed in your scene.
Add-ons: extra features
Add-ons are optional tools that ship with Blender and are switched off by default, which keeps the interface minimal and startup fast. To use one, open the Add-ons section, type in the search box to find it, and tick its checkbox to enable it. Unticking disables it, and no restart is needed in either case. Expanding a row reveals its details. Blender 4.2 introduced the Extensions platform, so new add-ons are browsed and installed from the Get Extensions section, while the add-ons bundled with Blender appear in the Add-ons list and are enabled with a single checkbox. To load a legacy script, use the Install Legacy Add-on button.
Figure: enabling an add-on via the checkbox.
graph TD
  A[Add-ons section] --> B[Search box]
  B --> C[Find add-on]
  C --> D{Checkbox}
  D -->|ticked| E[Enabled]
  D -->|unticked| F[Disabled]
Input on laptops without a numpad
Blender assumes a numpad and a three button mouse, but many laptops have neither. The numpad keys control camera views, so pressing Numpad 1 gives the front view, while the middle mouse button orbits the view. On a laptop the number row performs no such view action by default, and there is no middle wheel-press available to orbit. Without a numpad there is no quick front, side, or top view, and without a middle button there is no orbiting. The solution is two checkboxes in the Input section.
Figure: what standard Blender expects versus what a laptop lacks.
graph TD
  A[Standard Blender] --> B[Numpad = views]
  A --> C[Middle button = orbit]
  D[Laptop] --> E[No numpad]
  D --> F[No middle button]
Configuring the Input section
- Open
EditthenPreferencesand click Input. - Tick Emulate Numpad so the top number row acts as the numpad.
- Tick Emulate 3 Button Mouse so
AltLMBorbits. - Close the window. The change is already saved.
With Emulate 3 Button Mouse enabled, Alt and left drag orbits, Shift Alt drag pans, and Ctrl Alt drag zooms. There is a trade-off to state clearly: Emulate Numpad makes the number row produce camera views, so in Edit Mode 1 2 3 no longer switch vertex, edge, and face select modes. Those selections must then be made from the header buttons.
Input, Navigation, Keymap
These three sections are central to customisation. Input governs mouse behaviour, emulation, drag thresholds, and tablet settings. Navigation covers orbit style, zoom direction, and the fly and walk modes: it is where the zoom direction can be reversed if scrolling feels inverted, and where Orbit Around Selection can be enabled. Keymap exposes every shortcut in Blender, which you can search, rebind, import, or export. Use the Keymap search box to find what a key does or to change an existing shortcut, but beginners are advised not to rebind shortcuts yet, since the lessons assume the defaults.
How preferences save
Blender saves preferences automatically. Changes are saved automatically when you close Blender, and they are stored in Blender's own config folder, kept separate from any .blend file. This behaviour is controlled by the Auto-Save Preferences toggle in the Save & Load section, which is enabled by default. A user who prefers to test settings without committing them can turn Auto-Save off, which reveals a manual Save Preferences button at the bottom to click when ready. Preferences are global and apply to every file.
Figure: how a changed setting gets saved, depending on Auto-Save.
graph TD
  A[You change a setting] --> B{Auto-Save on?}
  B -->|Yes| C[Saved on exit]
  B -->|No| D[Click Save Preferences]
Preferences versus Startup File
Students often confuse these two. Preferences describe how Blender behaves, including mouse, add-ons, theme, and keymap: they are global and auto-saved, and associated with Blender itself. The Startup File is the default scene, comprising the objects, camera, and layout you see on a fresh launch, such as the default cube and camera. They are different files: Emulate Numpad is a preference, whereas a pre-lit scene template is a startup file. The default scene can be replaced with any other configuration.
Saving your own Startup File
- Set up Blender the way you want it to open.
- Arrange objects, editors, and the current file's scene.
- Choose
FilethenDefaultsthen Save Startup File. - Confirm. Every new file now opens with this setup.
The shortcut for Save Startup File is Ctrl U. For example, you might delete the default cube, optionally add a plane, then save. This overwrites the default scene loaded on every launch, so save only when the setup is final. To undo it later, use File then Defaults then Load Factory Settings, which restores the original default cube. This step is optional for beginners but useful to know.
Summary
- Open Preferences with
EditthenPreferences. In Blender 4.2 it is under Edit, and it opens as a floating window whose changes apply live. - The window has fourteen sections listed top to bottom, with a search box and save, load, and reset actions; Get Extensions is new in 4.2.
- Add-ons are optional bundled tools, disabled by default and enabled with a single checkbox after searching for them.
- Laptop users should tick Emulate Numpad and Emulate 3 Button Mouse in Input, accepting that the number row then gives views instead of select modes.
- Preferences auto-save on exit and are global, kept separate from
.blendfiles; the Startup File is a different thing, the default scene, saved withCtrl Uand reset with Load Factory Settings.
Figure: the two main configuration paths, preferences and the startup file.
graph TD
  A[Edit > Preferences] --> B[Input: laptop fixes]
  A --> C[Add-ons: enable tools]
  D[File > Defaults] --> E[Save Startup File]